Cooking with Eczema

So.

This is my hand.

My other one is trying real hard to look like this.

They’re not particularly pretty at the moment, but they help me make beautiful things.

I never had eczema as a child.

It’s only shown up within the last 3 years. I’m starting to get used to it. Except when it jumps from one hand to the other.

And it’s still hell when I try to cook and I have a flare up.

Let me explain: a fundamental part of cooking is washing your hands. Washing my hands gets painful after a while even when I’m not cooking. I’m capable of washing my hands 7-10 times while I cook depending on if I have to handle raw meat or knead dough with my bare hands. You can’t avoid getting messy. I’ve used cotton gloves before to help cushion my hand, but they just don’t last long when you’re trying to chop onions

Particularly bad days are when my hand develops itchy blisters and I want to tear my skin off, or it’s dry like the Mojave desert and my cracking skin prevents me from balling my hand into a fist or holding a spoon properly without feeling intense pain. The condition of my skin can determine whether or not it’s even worth it to get into the kitchen.

Depending on the circumstances, it’s very likely that a passerby will hear me say an expletive or twenty. Sometimes a gasp if I end up scratching my hand really bad by accident. I have been known to break the skin if it’s terribly unhappy.

I know this blog is predominantly about cooking and food, but the preparation of food is a big deal. We take for granted one’s ability to do anything. I used to think nothing of my skin and hands for the previous 22 years until this began. It’s thrown itself into the limelight now and become one of my top priorities. It’s on my mind more often than trying out new recipes or tasting a new variety of cheese.

So I’m taking this opportunity to share the announcement that I have started another blog site where I focus on my skin; learning about what makes it angry some days and what I can do to make things better so I can get back to doing the things I love without pain. Feel free to check it out if interested, I’ve listed it below at the end of this post, but I recognize it’s not for everyone. It’s far less lighthearted than this blog here.

But again, for anyone who’s even remotely interested, feel free to click the link below. Thank you for reading.

A Roadmap to My Eczema

Orange Chicken Sauce

My family makes some damn good Italian food. As a result we never eat at Olive Garden. We will buy pizza sometimes though. The point is, we don’t pay for Italian food because what we make at home is just….better.

Asian food on the other hand was never something we made at home. We would go to the Chinese buffets or Liang’s every now and then. I absolutely love fried rice, but every time I make it it’s never any good. I bungle it and it’s always more mushy than anything else. Which is nasty. I’m getting better at noodles though. Linguini makes a decent substitute for lo mein, and stir frying vegetables goes well. Orange chicken on the other hand was always one of those dishes that intrigued me but I was too terrified to even attempt.

Until Snoop Dogg came along.

That’s a weird segue but it’s true. Last year I discovered that Snoop Dogg made a cookbook, and with him being friends with Martha Stewart I was a little wary. Was he gonna demand I pick up yak milk mozzarella for my grilled cheese sandwich like Martha? Because I can’t buy that anywhere DONT EVEN SUGGEST IT! But to my surprise it was incredibly simple. The cookies, the sandwiches, the waffles with chicken, they were all so simple! With ingredients I could buy anywhere! Even at the dollar store down the road. And it was from there that I tried my first orange chicken recipe and fell in love.

Orange chicken has one of those sauces that makes it incredibly hard to copycat when you’re eating it in a Chinese food restaurant. It’s sticky, savory, and jam-packed with a sweet citrus taste. And the color is safety cone orange for some reason.

This recipe is actually not Snoop Dogg’s. It’s a combination of Snoop Dogg meeting Chungah Rhee of Damn Delicious. I like aspects of both recipes and just put them together. Oh. My. Gosh. I will use this sauce on everything now. I’m gonna use it as seasoning in the crock pot, use it on chicken before baking it in the oven, drizzle it over steamed vegetables, and maybe use it as a marinade. I bet it would be good on fish too. Can I just drink it? Not acceptable? Alright, noted.

Orange Chicken Sauce

1/2 cup chicken broth

1/4 cup orange juice

1/4 cup sugar

2 Tablespoons apple cider vinegar

2 Tablespoons soy sauce

2 cloves minced garlic

2 teaspoons sesame oil

1/2 teaspoon crushed red pepper flakes

1 Tablespoon sesame seeds

2 Tablespoons corn starch

Orange zest of one really large orange

  1. In a medium saucepan over medium heat, combine all the ingredients listed above except the cornstarch and whisk.
  2. Bring to a low boil and add the cornstarch.
  3. Continue to whisk as the sauce cooks until fairly thickened.
  4. Remove from heat and use with desired food. Goes well with chicken, broccoli, and rice.

Suggestion: it couldn’t hurt to double this recipe if you’re feeding a lot of people. Or if you just really like the sauce.

Puff Pastry Cinnamon Rolls

I’ve done a lousy job at this blogging habit I had hoped to create for two years now. Or is it three? I forget. But happy 2020 I guess! The last time I posted on here it was when I was sick, and it set the mood for the whole year of 2019. Oof.

I confess, in the midst of my hiatus I’ve actually been trying to pinpoint the precise ingredients, spices and cooking methods of the most amazing quesadilla that is sold at the gas station in New Summerfield. There’s a real kitchen hidden in the back where this little Hispanic woman is working her magic. My boyfriend laughs every time I tear open the tortilla and scour what’s inside. I desperately want to post that recipe, but I haven’t got it quite right yet.

That’s my goal of 2020: to crack the case of the gas station quesadilla!

So then, let’s start the new Roaring Twenties off the right way with something that will ruin all your New Years resolutions of getting in shape: cinnamon rolls!

A Disclaimer: these are stupid-easy. You could probably make them at your next girl’s night, the kegger at your buddy Frank’s house, an hour before a baby shower for your husband’s nephew’s wife, etc.

I made these at 8:00 at night on a Tuesday. And they were amazing! So buttery….so sweet and flaky…..I think it’s my easiest recipe after brownies from a box.

And they use puff pastry! What’s not to love there!?

And It’s not too hard to make a glaze for them either out of milk and powdered sugar.

Except now I’m getting distinct flashbacks from when I read Junji Ito’s Uzumaki…

Oof…..that brings back memories…..


Cinnamon Rolls

1 17.3 oz box Pepperidge Farm puff pastry, defrosted

1/2 stick butter, at room temperature

1/2 cup sugar

2 Tablespoons ground cinnamon


  1. Preheat oven to 400 degrees
  2. As the puff pastry and butter come to room temperature, mix the cinnamon and sugar together.
  3. When defrosted unfold the puff pastry so it lies flat in a square shape.
  4. Sprinkle cinnamon sugar on the puff pastry and pat it into the dough. Flip the dough over.
  5. On the other side, spread out butter so that it covers the whole other side of the puff pastry dough.
  6. Sprinkle cinnamon sugar onto the buttered side of the puff pastry until evenly covered. Since you probably won’t use all of the cinnamon sugar, feel free to keep it to put on toast.
  7. Begin to roll the pastry into itself until it becomes a spiral tube.
  8. Slice the tube into 1 inch slices.
  9. Place the slices on a baking sheet lined with parchment paper, about 2 inches apart. (I didn’t have parchment paper. I used aluminum foil like the HEATHEN I am.)
  10. Bake for 15-20 minutes until puffy and golden.
  11. Drizzle with glaze and serve piping hot with coffee or tea.


For the glaze

Honestly you can make as much as you want as long as you keep to this ratio:

2 Tablespoons powdered sugar=1 teaspoon milk

So for this recipe I recommend 4 Tbsp powdered sugar=2 teaspoons milk

Egg Drop Soup

I don’t feel well at the moment.

I don’t have the flu, but I’m pretty sure I caught something from the two-year olds at story time.

So today I’m taking care of myself.

I had a warm bath, I’m having an anime marathon, I have some snuggly dogs by my side, all I need now is some sustenance.

And today I’m craving soup. But not just any soup, I want the easiest soup in the world to make. Chicken noodle is not going to cut it. And I’m not going to open a can of soup.

I’m making egg drop soup that only uses three ingredients. I can cook this even when I feel achy, have the chills, or have a pounding headache. Because today I have all three.

Happy sick day to me!

Egg Drop Soup

2 cups chicken broth

1 Tablespoon soy sauce

2 eggs

  • In a small-medium saucepan combine the chicken broth and soy sauce. Bring to a boil.
  • Crack the eggs into a small bowl and scramble together.
  • Once the broth is boiling, add the eggs, they should instantly cook and float to the top.
  • Serve hot and with crackers if desired.

Pocky Bonbons (Dan and Phil Inspired)

In the spirit of the season of Valentines/my boyfriend and brother’s birthdays, it doesn’t hurt to keep a little something sweet on hand.

It also gives me an excuse to make recipes from my favorite British baking duo: Dan and Phil.

Are they the best bakers ever? …….eh, not really. But I appreciate the fact that their recipes are fantastic for novice bakers. Which means you don’t have to be the Barefoot Contessa to make a good dessert. Plus they’re awkwardly hilarious!

Now the original recipe was for festive Halloween monster pops, but honestly you can decorate them for anytime of the year instead. And what’s brilliant is that there is no actual baking. So you can totally make these in the middle of August in Texas, where it’s miserably hot outside, without turning on your oven.

I did however change these a little from their original recipe. For one: I hate white chocolate. I know that’s weird, but I do. I prefer almond bark. Secondly: instead of wooden baking sticks, I used Pocky. Which, for those who don’t know, they are Japanese chocolate covered cookie sticks. This way there was no unnecessary waste after eating the pops! You just eat the stick and all!

I also cheated and used chunky peanut butter instead of smooth. It worked all right for me. And I didn’t use “pumpkin spice”, I opted for only cinnamon and nutmeg instead. What can I say, I’m a lady who knows what she likes.

Pocky bonbons

*ALLERGY WARNING: this recipe uses peanut products. Do not use if allergic to peanuts. Use an alternative nut-free spread if need be.

1 2.4 oz box Pocky sticks (chocolate flavor)

2/3 cup peanut butter

2 Tbsp sweetened condensed milk

1/2 tsp vanilla extract

1/4 tsp ground cinnamon

1/4 tsp nutmeg

1/4 tsp salt

3/4 cup (6 oz) almond bark

1 Tbsp coconut oil

Decoration sprinkles

  • In a large bowl, combine the peanut butter, sweetened condensed milk, vanilla, cinnamon, nutmeg, and salt.
  • Stir all ingredients together until it forms a well solid ball and the sides of the bowl are clean.
  • Get a flat baking sheet or small platter and cover with wax paper.
  • Separate the dough into 12 or 13 small balls, rolling the dough in your palms to make them smooth (don’t make them into dodecahedrons or pyramids).
  • Open the box of Pocky sticks and gently skewer each ball onto a Pocky stick.
  • Carefully arrange on platter and place in refrigerator for 20 minutes to chill.
  • While the pops are chilling, fill a saucepan halfway with water and place on medium heat.
  • In a large metal bowl, make the candy coating by placing the almond bark and coconut oil together and placing the whole bowl on the steaming saucepan. (This is called a double boiler or a Bain-Marie. The steam will melt chocolate, almond bark, butterscotch chips, etc.)
  • Stir almond bark and coconut oil until creamy and melted.
  • When the pops are chilled, pull out of refrigerator and swirl each pop into the almond bark coating, placing them back on the tray when covered.
  • When all are covered, decorate with sprinkles, more icing, or whatever you want.
  • Place back into refrigerator for 30 minutes
  • Remove from fridge and enjoy with a hot cup of tea or cocoa.

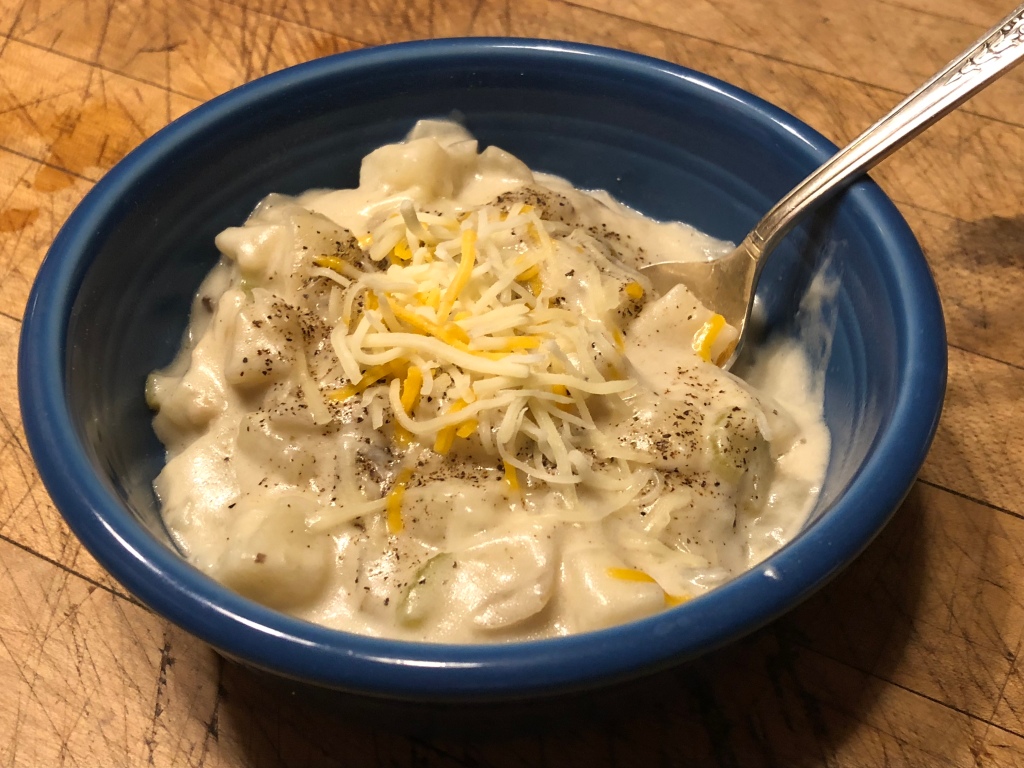
Easy Last Minute Potato Soup

This time of year I crave soup, soup, and more soup! Chicken tortilla soup! Vegetable soup! Chicken and Dumplings! Soup beans with cornbread! Egg drop soup! Miso soup with wontons! I love them all! I had to give up cup noodles for a while because I got sick from a new flavor. Alas…. Especially because I’m easily prone to cold weather, a warm hearty soup is one of the few remedies that will legitimately warm me up without putting on a thousand layers of coats and sweaters. I don’t like looking like an old school deep sea diver all the time.

Potato soup is one of those dishes that always intimidated me because it seemed as if it took all day to cook. Thankfully I have found a potato soup recipe that takes less than an hour to make! So it’s great for those busy weeknights when you’re so tired that you just want to order takeout. It helps to use leftover baked potatoes and cream of mushroom soup. It streamlines the whole cooking process.

Last Minute Potato Soup

1 large potato, baked

1 large onion

2 stalks celery

1 stick butter

1 can Campbell’s Cream of Mushroom Soup

2 cups whole milk

Salt for taste

  1. Melt the butter on the stovetop in a Dutch oven or stewpot
  2. Dice onion and add to melted butter
  3. Chop celery and add to pot
  4. Sprinkle with salt and sauté until onions are translucent
  5. Peel baked potato and chop into small chunks and add to pot
  6. Open can of cream of mushroom soup and empty into pot
  7. Add milk and stir everything together
  8. Warm thoroughly and serve hot with shredded cheese on top

You’re a Mean One, Mr. Grinch (or my struggle with gift giving and gratitude)

Happy holidays of seeing jewelry commercials and smiling families eating Pillsbury crescent rolls!

In the last year I have become increasingly cynical and downright grinchy around this time of year. Allow me to get on my soapbox.

*clears throat*

I want to believe in the magic that is unconditional love for complete strangers you meet on the street, but when you consistently see the dumpster fire that is people in general…….you can’t help but be skeptical. Course I’m an introvert so people in general exhaust me.

Which brings me to controversy of gift giving. Very recently a close friend of mine celebrated their birthday. It was…..conflicting.

Not because they hate birthdays, but because people around them made it all about themselves. From relatives wanting to take over the day, to a complete lack of caring by others, it was a mess. A few days after, an acquaintance dropped by her house and all but threw a store-bought cake in her face. It was white with sprinkles. That gift was accompanied by a passive aggressive rant over how my friend had cost them money and how that wasn’t appreciated. Followed by how hard their own life was, how busy they were, and how my friend “could just never know how hard things were”.

That’s quite a happy birthday isn’t it?

I know I talk on this blog about how special food can be to share memories, but when food is shared in such a way that it creates a sour memory, it becomes tasteless. A delectable meal handcrafted from the finest chef would instantly lose appeal if it was given in such disdain. Like the cake.

For some reason, people think that as long as you deliver a gift, that’s enough. There is not much attention paid to the manner in which the gift is given. My friend was given a cake because, hey, it’s a cake. Not out of love and desire to spend time with her. To my friend, it was clear that the person was saying that she was not worth the time.

I have also become very conscious not only of how gifts are given but received.

Over the years I have given many presents that were either thrown by the wayside, criticized, or handed back to me a few months later because they forgot that I was the one that gave it to them. Back in July, I gave a handmade gift that was promptly given back to me as soon as it was opened. That one hurt. I had given it in a manner of love, but was slapped in the face with it.

What is the point of holiday shopping if the person you shop for doesn’t even care what you give them? They’ll most likely buy what they want themselves an hour later.

What’s the point……

So therin lies my conflict. How do I reconcile my feelings surrounding the thoughtlessness of human beings, with the unquestioning generosity and gift giving this time of year flaunts in my face? My mom says to love people where they are. Sometimes that feels like sticking your whole hand in a waffle iron: it’s incredibly painful. Why do it if it ends up hurting yourself? I wish we could actually enjoy other people, instead of saying we should and throwing that idea by the wayside because of petty selfishness and shiny baubles.

If anyone out in the blogosphere has any ideas, I would be happy to hear it. I don’t want to be a grinch, but I will if I have to be. In the meantime, I’ll be hating The Who’s on Mount Krumpit, spending the holidays with my grumpy dog Dobby.

What happened to the birthday cake? It was never eaten. Untouched. It sat on her table for three days as a reminder of how little people cared. Eventually it was thrown out.

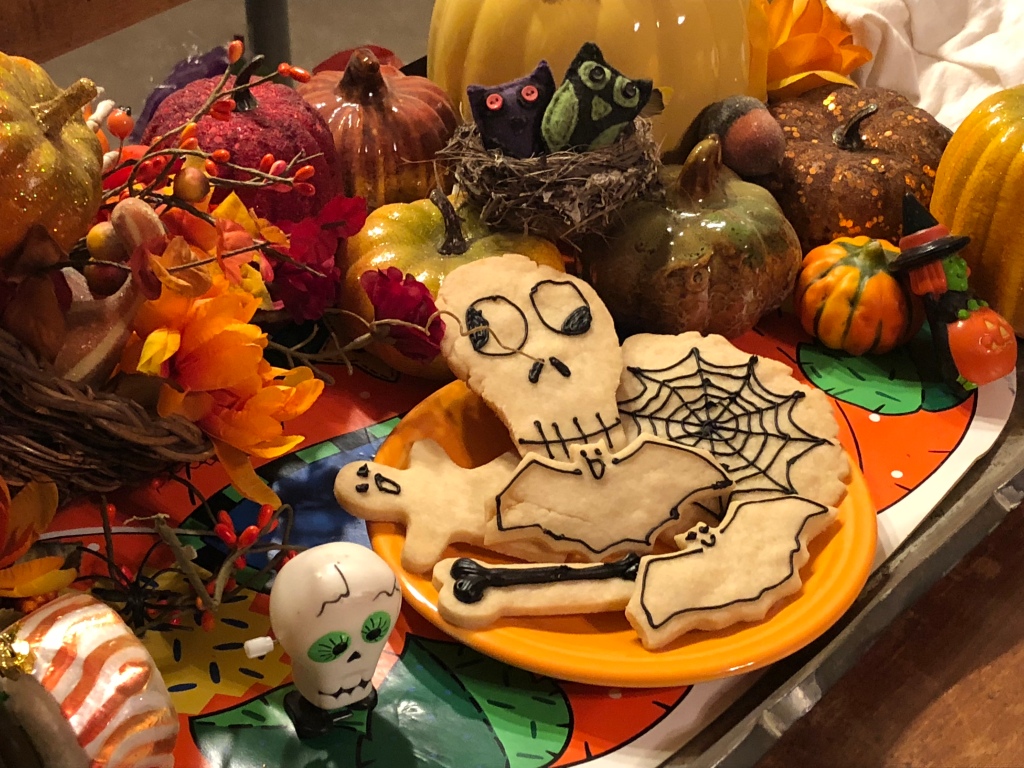
Spooky Shortbread Cookies

October is my favorite month of the whole year. Pumpkins, monster movies, ouija boards, Ray Bradbury stories, Vincent Price, and of course Halloween!

And what a better way to celebrate the shortening days than with a cup of piping hot tea and Scottish shortbread cookies?

I love shortbread cookies. The perfect combination of crispy, buttery, but not too sweet. You have to try really hard to mess them up. And they’re usually only 3 main ingredients: butter, flour, and sugar. Although at my house we add a dash of vanilla.

But after looking at my childhood Halloween craft books, it clicked in my mind how easy it would be to make festive cutouts like skulls, bats, and ghosts!

If you have festive cookie cutters, great! If not, you can draw your own shapes on construction paper or index cards and cut around them. It’s pretty straightforward. I had cookie cutters of ghosts, bats, and bones, so I had to make my own skull pattern.

Frosting is optional too, but I wanted to make them prettier. Boy did I find out how hard it is to do icing decorations! My respect for cake decorators has increased dramatically!

Spooky Shortbread cookies

  • 2 sticks butter
  • 3/4 cup sugar
  • 1 tsp vanilla extract
  • Pinch of salt
  • 2 1/3 cups flour, plus extra for dusting rollout surface
  • 1 tube ready to use black buttercream frosting
  1. Preheat oven to 300 degrees F.
  2. In mixing bowl, cream butter, sugar, vanilla, and salt.
  3. Add 2 1/3 cups flour and mix until well combined.
  4. Sprinkle flour on a flat surface
  5. Separate the dough into two halves to work with. Place one half on floured surface and using a rolling pin, roll out into slab 1/4 inch (1/2 cm) thick.
  6. Cut out shapes from slab, and place on non-stick cookie sheet.
  7. Gather up slab and re-roll, cutting out more cookies
  8. Once cookie sheet is filled up, place in oven and bake 17-19 minutes
  9. Let cool on wire rack
  10. Once cooled, decorate with buttercream frosting
  11. Serve with hot tea, coffee, or cocoa.

Mushroom, Onion, and Spinach Frittata

I’ve been doing yoga more recently. Although I may not be able to contort my body in all of those crazy poses, my abs feel sore and my legs are jelly sometimes which must mean it’s working. I guess.

But lately I’ve been craving frittata! I confess, I have no idea how other people make it. I have only ever made it from scratch myself or with my mom. It is kind of like a baked omelette. But I feel like this version is 75% vegetables instead of mostly egg. It’s my go-to meal for clearing up space in the fridge, solving dinner dilemmas, and getting my dose of both comfort food and veggies. It’s especially good with fresh eggs!

This recipe can easily be diversified with shredded carrots if desired for a little more color. And Panko bread crumbs or French fried onions on top make it even more delightful!

Mushroom, Onion, and Spinach Frittata

1 onion, diced

8 white button mushrooms, diced

3 stalks celery, chopped

3-4 cups fresh organic baby spinach

9 eggs

1 teaspoon turmeric

2 cups shredded cheese

Panko bread crumbs (optional)

  1. Preheat oven to 350 degrees
  2. In large skillet, sauté the onions, celery, and mushrooms until cooked through and onions appear translucent.
  3. Add spinach and cook down until wilted.
  4. In a separate bowl crack the eggs, add the turmeric, and scramble them all together.
  5. Add the scrambled eggs to the mushrooms, onions, spinach, and celery.
  6. Sprinkle cheese and breadcrumbs on top
  7. Place in oven and bake for 15-18 minutes until frittata is puffy
  8. Remove from oven and serve immediately with salsa.

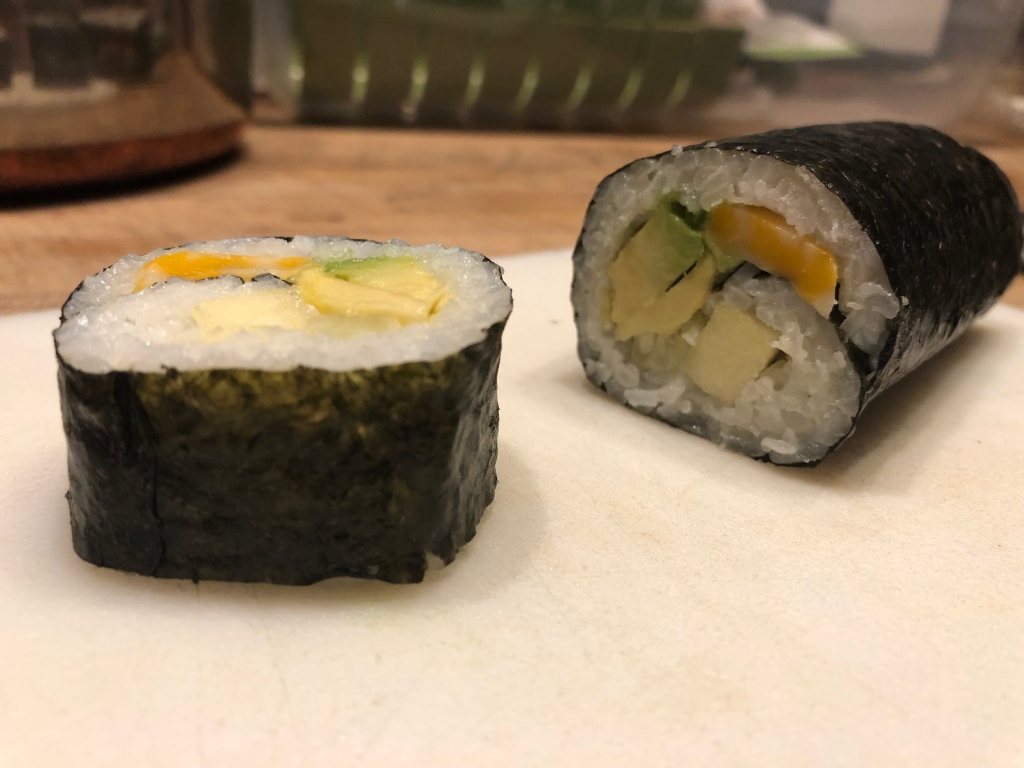
Green Dragon Sushi 🐉🍣

My dog has never eaten sushi, but nevertheless he’s obsessed with it. He is so fascinated by the food prep and wonders why I’m on my feet slicing, rolling, and arranging so many various foodstuffs in the kitchen. It’s ok Dobby, you are more than welcome to keep me company.

I first got my SushiQuik kit back in January and have been playing with the right food combinations and flavors to get the perfect sushi concoction. It wasn’t so easy. I had to do a lot of outside research and it wasn’t always pretty. Although red food coloring makes for nice looking Valentine sushi, the the seasoned rice vinegar distracts from the inside flavors way too much. And when I say distract, I mean full on destroys any other flavors that may be present.

From cookbooks, to the Food Network, to watching and quizzing the sushi chefs at various restaurants, I have garnered enough tips and tricks to feel confident sharing perhaps my best and favorite sushi roll to date!

Ok maybe it isn’t sushi in the traditional sense. I followed the advice of one sushi chef and used a combination of lemon juice and orange juice to season the rice instead of rice vinegar and sugar. I also had no fish but I was craving sushi like crazy! So I had to improvise and use apples. It isn’t full on vegan, but for vegetarians it should work nicely. It made three long rolls and I ate them all. By myself. No regrets.

As soon as I made them up, my mom helped me arrange them to look pretty for nice photos. But then we had a little too much fun and arranged them to look like a serpent. So voila: green dragon sushi. Honestly I’m tempted to color the rice green to really make it work.

Green Dragon Sushi

    1 1/2 cups sushi rice
    2 cups water
    1/3 cup lemon juice
    1/3 cup orange juice
    3 sheets nori wrappers
    1 mini cucumber
    1 gala apple
    3-4 individual packs Sargento Colby Jack Cheese (or substitute Arla Gouda cheese)
    1/2 avocado
    1/4 cup Kikoman soy sauce or Hoisin garlic sauce.
  1. Measure out the rice and put into pot. Add water and set on medium heat.
  2. Once water comes to a low boil, cover the pot and turn the heat to low. Cook approximately 15 to 20 minutes.
  3. While rice is cooking, cut the cucumber, apple, cheese, and avocado into smaller rectangular slices, removing the peel on the apple and cucumber.
  4. Once rice is done, remove from heat, fluff rice with a non-stick sushi rice paddle.
  5. Add lemon juice and orange juice to the rice. Mix well.
  6. Place nori sheet on rolling mat and spoon out small portions of rice onto the nori, pressing down firmly into place.
  7. Cover whole nori wrapper in rice, leaving the top and bottom of the wrapper exposed.
  8. Place fillings of cucumber, apple, cheese, and avocado in the middle of the rice.
  9. Wet your finger with water and coat the bottom of the exposed nori sheet with water (this will help it to stick together).
  10. Slowly begin to roll the mat that allows the ingredients to be surrounded in rice.
  11. Roll the sushi roll to end of the exposed top of the nori. Wet the nori top. Finish rolling onto this exposed top and firmly add pressure here to seal.
  12. Remove mat and take roll to cutting board. Slice the roll to desired thickness with a sharp knife in that has been rinsed in water (again, this helps for it to not stick).
  13. Repeat steps 6-12 two more times or until amount desired.
  14. Arrange sushi onto a plate in a snaking pattern and garnish with apple triangles for scales, and cucumber strips for tail, horns and snout.
  15. Serve with side dishes of soy sauce or Hoisin garlic sauce.